As a member of Group 8 I will be jotting down notes about the presentations from the groups in cluster one but also attending cluster two for photos and future inspiration.
Group 1: Michael & Martin
The project aimed to express feedback in some sort of flow, after taking inspiration from multiple kinds of “flow”, they decided to use this prototype to unpack flow from traffic. Like people coming in and out of a queue, cars stopping and going, etc. Very tactile feeling apparently sensed from the body, but tactile feeling can recede into a larger meaning, that meaning came after.
Group 2: Thanita & Snezhana
3D artifact represents activity on keyboard. Backspace reversing the spinning movement, Enter button changing position. When typing moving is simply continuous. There’s something interesting with writing and rhythm! Like a metronome.
Group 3: Liam & Jesper
Inspired by Biking and Navigating on a bike, they strived to achieve getting feedback with servos to that concrete phenomenon. Experimenting with vibrations, they wanted to experiment how vibrations should/could navigate you- stimulating through vibration.
Group 4: Therese & Zakiya
Started by exploring using subtle head accessories to express feedback, but landed with being on the arm. Inspired by heart surgeons that have to monitor action, for example, entering a dangerous zone that requires extra and more intricate care. Working a lot with feel and sensations.
Group 5: Bahr & Caleb
Sticking hand into globe that has fuzzy feathers inside it, experience fuzzy and “enjoyable” feeling while servo moves. Giving concrete texture that came in and out of state. Connected to mood.
Group 6: Nefeli & Malin
Inspired by the level tool, feedback from level tool, material, how does it feel to balance and center something. The structure is built playfully like a game, with buttons incorporated for input and tight coupling with the output which is the movement of the strings tying to the tube which tilts, moving the ball within left and right.
Group 9: Kim & Melika
Experimenting with “readiness” and more temporal elements. This drove them to the idea of not being so restricted to time, but more about something approaching and leaving. Their artifact experiments with readiness, instead of utilizing the rotational movements that servos afford doing they used them to showcase more linear motion & velocity.
Group 10: Josefine & Victor
Expressing feedback with pulse. Like an external mechanical heart you attach on your arm. Sensation provided is that it kind of like an exaggerated sensation of your own pulse, pulse blends in with artifact. To add nuance they experimented with Synth (ADSR). Experimented with how to make the muscle contraction, heartbeat feel realistic.
Works from Cluster 2!
Roel & Simon’s Wave-maker
Julija & Victor’s Light sensor servo bug
Manuel & Weronika’s Dancing keyboard
Fariborz & Richard’s Rotating styrofoam geode
Felix & Denisa’s Milestone
Jovan & Lucie’s “Nail theatre”
To see entry on our own group’s critique & feedback, as well as additional final reflections, see the next entry.
This entry is dedicated to discussing our final days with the MII prototype as well as our final product.
Setting up a UI to establish richer nuance
A UI was set up to easily manipulate the behavior of our choker artifact and to fulfill the requirement as part of the project to establish nuanced feedback. The last day was spent with the code. After the failure of incorporating new materials and sensations (since the beads didn’t work, the feather stayed but we didn’t do much with it), we sought after finding ways to add dimensions to our pre-existing tightening effect that our choker presents.
The first range slider– tightening, adjusts the orientation of the servo, which adjusts the tightening-effect. The amplitude manipulates the movement of the servo, the higher the amplitude, the bigger the movement (left and right) is. When the amplitude is fairly low, the movement is very subtle. And the last factor, speed, obviously just controls how fast it moves.
In our last days, we were still pushing to try new materials and new sensations, and Patrik built a new wrist band, typically used to hold ipods, and implemented the bead action. It worked and everything but we felt like it was too last-minute to be incorporating this into our final prototype for showcasing. In addition to that, because it’s a complete new sensation, it might be difficult for it to be interpreted as a “whole” with the remaining sensations, unless we program the movement a certain way to present some sort of a “flowing” motion like the project Clint talked to us about during coaching.
Clint gave us tips regarding our current prototype. He compliments us for having set a very narrow context but pushes us into experimenting with more “dimensions”.
In addition to this main critique, he further explained that it wasn’t necessary to establish fully nuanced feedforward if we already have rather nuanced feedback planned as part of our artifact. We explained that the green and red LED lamps we incorporated turned out to present itself more as a feedback rather than feedforward. He agrees that it behaves more as a feedback than feedforward indeed but it’s almost redundant to incorporate that as part of our artifact because it’s not powered by the servo at all, even though it behaves based on the state of the servo. We decided to scratch this idea.
The plus about this artifact is that the choker does not necessarily have to be limited to being about weather, it could be about anything! pollen levels, homework load, and so much more. This is what makes the prototype versatile so it’s important to add more nuances.
What we moved on with was ideating about more potential materials or sensations we can play with next. In addition to that, we ideated about adding scales / range sliders to a UI so we can experiment with nuance.
More sensations we thought about:
Choking / Tightening (current)
Tapping / Rhythm
Vibration
We discussed about adding other parts in addition to the main choker after Clint introduced somebody else’s project having three separate arm pieces attached that tap consecutively and though they are obviously separate pieces the sensation of them tapping in order gives the false perception that they’re presented as a “whole”. We thought this would be interesting to explore but also a little hectic with the limited time left to create additional pieces that essentially do the same thing.
What came next?
We bought a few beads to see what we can do with it, but was mostly obstructed by a dead-end, it was very difficult to maneuver the beads due to the choker’s close contact to skin. Because it’s so close in contact the beads are unable to move between the fabric and the skin due to friction. We tried different mechanisms to experiment but it didn’t really work…
Sketches for sandpaper mechanism
feather attached
The next day we also tried experimenting with other sensations such as tickling and scratching, which i dug up sandpaper and feathers to play with that. The sandpaper mechanism was way to bulky to incorporate into the choker and it’s also way too painful so we quickly “scratched” that idea (pun intended), and the feather movements are hard to incorporate nuance too, it’s also not impactful enough to be a “dimension”. We kept it attached to the artifact still however for it to remain as a decorative element.
Like I mentioned in the previous journal entry about nuanced feedforward, we experimented with lights as a feedforward (though that didn’t really workout as we figured after testing that it resembled feedback more than feedforward as a function). We utilized a red and green light, the red LED flashes when no action is being performed by the choker, signaling a paused state. While the servo moves, the light turns green until it gets paused again and turns red. This has only been implemented on the Arduino board, we have not attached this to our main prototype’s body. But we will experiment with that the next time we meet.
Red: paused state, Green: moving state
In addition to ideating more about feedforward, we did a general upgrade with our prototype from last week. I had found a scrappy belt from home that affords adjustment and thought it would be a perfect solution to us wanting to make the choker easily adjustable. We decided to try it out by implementing the servo (similar mechanism with wooden board) as well as a plastic guider (this time decreasing it to just one because we figured we don’t need so many to initiate the same force).
Adjustable belt so it fits on all-sizes, universal choker!
With the adjustable belt, we were able to test it at multiple places on our body: including the neck, upper abdomen, upper thighs, wrists, and upper arm. They both exerted about the same amount of force but each revealed slightly different nuances. I’ll explain this more below.
This is how it looks as of now, as you can see, a much more simplistic design but equally as powerful when it comes to choke force.
Reflect, Articulate the Experience:
Still stuck with manifesting nuanced feedforward.
We thought the lights would potentially contribute to nuanced feedforward but it ended up being more of a feedback that follows the motion of the servo.
Maybe play more with the light see if we can make it more feedforward-y (but how?)
New upgraded choker, the force felt a little more subtle with the decrease of plastic guiders, but you can definitely still feel the “choking” sensation. How to improve this?
Removed a few parts, made it a little more simplistic but the deed is still being done
Adding the adjusting element was valuable because we were able to test it on different parts of our body (thighs, wrist, upper arm, under the chest, neck), all provided different nuances, with the neck it was the most suffocating but when it was on the abdomen we felt like we had to suck in to prevent the mechanism from ripping apart and that created a stronger effect for “choking”
Today our peers in the lab reminded Patrik and I that in addition to expressing nuanced feedback we need keep in mind that expressing feedforward as a textural quality is equally as important. After all, MII is all about expressing feedforward with nuance.
We discussed the concept of feedforward a little, it being a product already offering information even before the user performs an action, unlike feedback, where the information is given during or after an action.
Three main types of feedforward (and how we could apply it into our current prototype):
Inherent Feedforward
An Inherent feedforward is information that communicates what action is possible. We remembered the GUI course when we discussed about the scroll to unlock feedforward mechanism in older iOS operating systems. Discussing it inherent feedforward in our prototype we thought about LED lights, arrows, vibrations that perhaps signals how the choker should be worn and tied.
old iOS lock-screen feedforward longer implemented
Augmented Feedforward
Is receiving information from an additional source about action possibilities. We discussed either a UI that provides information or a written manual placed on the side of the choker to guide users.
Functional Feedforward
Informs users about a more general purpose of the product, showing product semantics, perhaps making the functional parts of the prototype visible to the user would be useful for our prototype (though right now it’s prototyped like so).
In general we’ve discussed perhaps incorporating
Sound (voice commands: “device ready”, “place on wrist”, musical tunes that indicate state, etc)
Color & Light (to prompt action such as red light-not ready, green light-ready)
Vibration (Quick vibrations that signal something, we discussed this later and decided it was too hard to incorporate because servos are not strong, fast enough)
Ultimately, Patrik points out that not having a GUI is probably a goal, though I still would like to experiment with that, see how that feels. We decided to start by experimenting with red and green LED lights to begin with. It worked, but it felt still more of a feedback than feedforward, as the information was provided during the action, instead of prompting the action itself. We will perhaps begin playing with voice commands once we gather more information from coaching regarding how to incorporate feedforward.
Servo set-up, observing the movements, what the servo is capable of, what type of motion it supports, how can we interact with it, how can we “feel” things by using it? etc.
Ideation, Sketching:
We started the whole ideation limiting the space to “toys”, as well as discussing about the setting of a home. There we did some brainstorming and researching for interactive toys around the world. Patrik found a few videos and the we came across a video of an interactive game (not digital) where one is required to drink from a glass without using their hands. It’s called Beer Puppetry or the Human Puppet Drinking Game and I thought that was both entertaining and perhaps fit into the concept of fluid coping fairly well: with the awareness of the whole wooden mechanism (and the intermingled properties of the mechanism) slipping away– because the attention is drawn to the beer itself. People who play the game therefore somewhat disregard the device completely and smoothly interacts with the beer glass.
We were then informed during coaching (see previous entry for coaching) that we need to strive to express feedback & feedforward with nuance (richness of deeper meaning, not extremely apparent, a subtle distinction or variation). We started yesterday (September 26th) discussing how to inflict the sensation of choking utilizing a servo since the idea of the doughnut feeder was quickly blown off due to the limited and not-so-rich nuances for feedback & feedforward.
So why choking? During coaching Clint had brought up the idea of a prototype changing orientation due to wind direction (I don’t recall why exactly it was brought up, but it was an answer to something Patrik asked). The idea is that the artifact should be perceived as a whole despite having several elements, and it should be continuously “available”. I interpret the idea of something being continuously available as it’s able to be picked up and used in an out your flow and can always adapt to your actual doing.
When I heard the idea of wind direction something sparked in my mind: to incorporate the state of weather to the body.
So why weather? Weather is so important because it affects almost everything we do in our daily lives. Based on the weather we determine what activities we can do, what to wear, and so on. Many equipments, applications and programs have been designed to help us predict weather in the foreseeable future, and several UIs are designed carefully to cater to the daily user that needs to check for details on weather in specific locations.
We first ideated on what this artifact could be capable of and then how it should look and be implemented.
We talked about different aspects on weather, and different scales that are used to determine multiple aspects of weather. Such as:
Wind Speed
Wind Direction
Air Pressure
Air temperature
Humidity
We had absurd ideas such as changing the heat of the artifact to insinuate the temperature, mimicking the sensation of wetness depending on the humidity, and so on. When it came to utilizing the servo, we were inspired by Kovtun I’s example of “Tapping” where he played around with the sensation of beads being pulled and released to feel the tension of the beads being pulled and “sucked in” by the servo as well as the released state of the beads relaxed, swinging and “tapping”.
Kovtun, I. 2019.
Then thought about the sensation of tightening and “choking” and how that feeling can correspond to weather when looking at air pressure. When air pressure is lower in the atmosphere, the lungs need even lower air pressure in order to inflate because air moves from high-pressure areas to low-pressure areas. That’s why it’s harder to breathe in higher altitudes with low air pressure. We could tie in the choking sensation to correspond with the pressure in the environment.
Then Patrik brought up the idea of having the choking sensation be related to the amount of Air Pollution in the air. I thought this was even more brilliant of an idea judging by all the controversies going on nowadays regarding climate change. The artifact could potentially be used to raise awareness somehow (and extremely “woke”).
Something that you wear on yourself that interacts with you and the atmosphere is something I interpreted to be “continuously available”. It’s intuitive, and if implemented correctly, could be perceived as a whole despite having multiple elements and functions.
We thought about using the scale of a few pollutants judged as part of the AQI index (PM 2.5, Ozone, PM10), and somehow implement some sort of “sensation” for each element, while keeping the whole choker as a “whole”. This artifact would also be rich in feedback (output) because it will inflict several sensations to the body, sending multiple messages rich in nuance.
The plan is to implement a Weather API and somehow be able to freely change the state of the “choker” depending on which area you click. The pollutant to focus on would probably be PM 2.5 as it’s the most harmful and most damaging to the lungs. It’s what chokes the lungs are these particles so the choking sensation would probably correlate to PM 2.5 levels in the atmosphere.
When it came to where on the body the artifact should be worn, we’ve so far discussed the placement to be the neck (literally choking), the wrist (most handy, usable, aesthetic) and over the abdomen under the lungs (to “choke” on the lungs”).
Implementation:
The plastic guides guiding a flat rope through.
Building the prototype: We mostly scavenged around for material that we could implement into our first prototype, such as cloth from home, flat plastic block guides where string can pass through (we still don’t know what these are actually used for) from the lab, and other materials like wood and metal just collected from the work shop. With the assistance of hot glue we presented a shabby construction of the choker. A lot of improvements could be done but at least we were able to mimic the sensation of tightening and “choking”.
The artifact “choking” and releasing. The code we’re using is servo-playground where we manipulate the single turn value between 0 and 180 (180 releases, 0 tightens).
A more detailed infographic of our first lo-fi prototype
Video:
Reflect, Articulate the experience:
Similar sensation to blood pressure taking
Below are some reflections and experience we’ve gathered from experimented with this first prototype.
The fabric “tightening” emits the sensation of “choking”. This sensation can be described as that of how a sphygmomanometer (blood pressure gauge) in-use feels.
This artifact have not been considered in terms of user-value as no field research was done regarding whether something like this is relevant or could be useful or not.
Could experiment with making the choker more adjustable, so it can be suitable for different sizes of arms/wrists, or different parts on the body- universal choker.
Investigate, do more research on the software and code. We need to search for a fetchable weather API which we can implement into our code.
Experiment with different rhythms, tightness, perhaps making the tightening more gradual instead of sudden.
Today after the lecture (Sketching & Methodology), Patrik and I spent the rest of the day reading the literature provided by Clint (and Written by Clint)- Designing for Coping. Highlighting key points as we went on, we tried to connect some dots as to how we can incorporate this concept into this next artifact we produce.
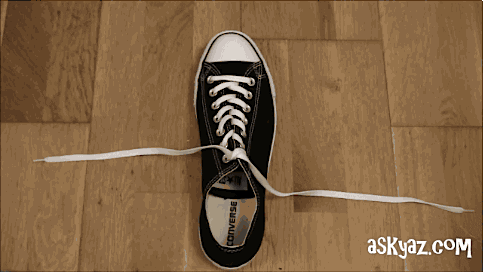
Tying shoelaces is a form of skilful coping.
People perform activities that they’re so used to doing that it hardly requires focus and attention anymore. Things like tying your shoelaces, riding a bike, buttoning a coat, and so on, we’ve performed these activities so much the movement is so deeply engrained in our minds that awareness is not required anymore. We do these things without “thinking about how to do it”.
The main takeaway from this paper is that perhaps we can do design the same way. The key is to design and artifact where people can fluidly cope with, without running into issues and placing too much attention to “cope around” it. We want to keep the user “in the flow”, and prevent a “breakdown”. Clint goes into what coping is, based on Dreyfus’s philosophy, it’s to achieve “ongoing, nuanced perception and response, striving for equilibrium”.
Some key terms were also introduced such as:
Malleability
Malleability is all about fitting an artifact into a situation in a durable manner. It is the practical possibility for an agent to materially tailor an artifact to fit situated requirements.
Direct Manipulability
Direct Manipulability is articulated by the tough coupling of action and response and its ready-to-hand-ness. Directness is not entirely about the mechanics of interaction but also regarding the result.
Meta Manipulability
Meta Manipulability is the nuance in how we’re able to work with tools as “objects” rather than as “tools”. The literature used a hairdresser being able to handle their tools by switching without putting it down to break the “flow” as an example of so. The tools are no longer perceived as tools more like objects that are moving with the flow of the body. Also can be seen as multiple elements being manipulated in tight unity of action.
Social Manipulability
Social Manipulability is all about how the activity we’re participating in is shown to others and perceived by others. It’s essential for coordinated action and sustains awareness. When you type on a keyboard, no matter “how” you interact with it (typing it vigorously- which can be perceived by those beside you) the output remains the same.
After reading, we quickly discussed within the setting of a home (since we had the setting of a home when we worked together last time during the Methods I project). Then we discussed about simply toys that are clever in design and discussed their mechanisms and why they’re so intuitive to use. This was our starting point, to analyze toys and look at what efforts in design we believe are put into them.
26th September- Coaching with Clint, Ideation, Setting up Servos
360deg continuously spinning servo
Today we went through the essence of this module again (what we’re trying to achieve, get out of it), understanding the requirements more (nuanced affordances/feedback/feedforward), I believe we have a better grasp of how to start.
We ideated a little more but during coaching, Clint had briefly discussed about an artifact that changes orientation based on wind direction. That’s when the idea of incorporating the state of the weather into something you where on the body, so you can know the state of the weather without really putting awareness. We looked into the mechanism of tightening and looked into what construction we could incorporate with out artifact (see below for string and plastic guides). In addition to that, we got the json-serial-bridge hooked up with the Arduino to work.
Today’s Sketching & Methodology lecture was held by Jens.
The lecture began with a general instruction of why this course and its modules falls into the field of interaction design and and was followed with a quick introduction of the different types of projects that can be written about for our Bachelor Thesis. It includes:
IxD Design Project (focusing on user research/technologies/concepts)
IxD Material Experimentation (focusing on experimentation with a particular technology/material)
IxD Methodology (focusing on studying and developing design methods)
IxD theory (focusing on analysis of theoretical perspectives)
This was helpful as it gave us a general glimpse into the future, so we can start thinking about what aspect of IxD interests us the most.
Then the second portion of the lecture was a reiteration of why sketching is an important method to go about with this module (since he noticed that this wasn’t widely used in the previous one). Sketching is useful because the activity serves as an aid to thought and creativity. It’s also extremely versatile as it can be done with all materials (even code!). Ultimately Sketching is an important philosophy because most designers do it and it aids us in a design process because you notice when you’re “failing early” which enhances learning.
Now that I know that sketching should be utilized in the upcoming design process I know I’ll be using it during the ideation process to guide my thoughts and help me visualize ideas.
The essence of this module is focus more so on the “output”, unlike the previous module, where we had to think about nuanced impressions (input) for the computer to read.
With the disposal of servos (tiny motors that afford being precisely controlled, such as allowing the shaft to be positioned at various angles, or having continuous rotation at various speeds), we have to come up with an artifact. Inspired by Clint’s paper on Designing for Coping, Dreyfus’s philosophy of skilful coping, and most importantly
Strive to express affordance, feedback, and feedforward as a textural quality (nuanced), Holistic, Continuously available, etc.
To kick off, we have to understand what Designing for Cooping is all about (read the literature!) as well as try to hook our servos up onto our arduinos, and get it to communicate with our computer via json-serial-bridge from Clint’s interactivity (I call it clinteractivity) websockets repository.
We experimented with audio for the most part as a surface-free impressive modality. Audio is a surface-free modality (part of hearing and sound production), we chose this output because it does not require a target surface to work though there’s still a “source” in the form of a physically located object (our computer screen). In our project we relieved the user of surface-bound impression, so what the users receives as an impression is more ambiguous and obscured. Only thing that’s inflicted on the user is music playing, which is a showcase of expression from the computer’s end creating an ambient character.
We realized at the end that maybe we’re still not following a strong sense of faceless interaction, as users are still actively interacting WITH particular (the camera. However, we believe that we’ve managed to guide minor perturbations by constant movements (free gestures) in our environment and moving in this so called “interactional force-field”.
In the second iteration of this module we wee careful with not utilizing one-on-one interaction (which is a mistake we made in the first codes) and to interact with another in this situational force-field.
Finally, the goal in our last experiment was also to experiment in a way that we achieve some richness but also don’t overcomplicate the process and lose the precision.
What do you understand about it now? (What is this understanding based on?)
We understand faceless interaction both in a weak sense and a strong sense and how each has its own advantages and disadvantages. To achieve full facelessness the risk is significantly decreasing precision, though it remains rich in complexity. Interaction complexity however is not exactly intuitive as you’re stripped away of full-control and full grasp of the situation
How did you arrive at the point you did? How did your work mature over the period?
We conducted direct experimentation for this type of interaction via live code. Along the way, we became more mature after trying first sketches, we grew to be more willing to take risks, moving on when we saw a dead-end. It was much easier to start the second tutorial than the first.
We experimented with some but not all features to achieve a fully “faceless” interaction. First sketch we worked with (emotions) worked with one-on-one interaction with the screen. We quickly discovered that this wasn’t faceless as the control was still directed. Then we thought to ourselves: Facelessness might be a disadvantage in our project? Because users remained conceived as interacting with particular.
Why did it feel like a dead-end (if it did?)?
First sample we did felt more like a dead-end, we took the emotions tutorial but managed to “do” things with it but it never arrived to being a properly faceless interaction.
It felt like a dead-end because we felt like it was time to move on to one of the machine learning samples instead because we felt like that had more opportunities. The project we have now however, we feel like has endless opportunities, we can experiment with more complex interactions and also more eventful outputs (impressions).
During Show n’ Tell:
What did I learn from show’n tell? I learned that most people went through similar processes, interpreted the project first as something and then shifting gears into something more complex after understanding more about faceless interaction. It was nice that we were able to learn from everybody, see how they interrupted the topic and how they spoke about it, because everyone had slightly different ways of describing it, all making sense in their own way.
Some summarizing words: Clint and Jens asked if we were able to design by thinking of it as a whole rather just participating too much on the complexity of the input. Tinkering was a new way of going about code and it was nice because we were able to get a sense of the material. Experimentation instead of setting a goal was nice because we were sketching to explore possibilities of the material.